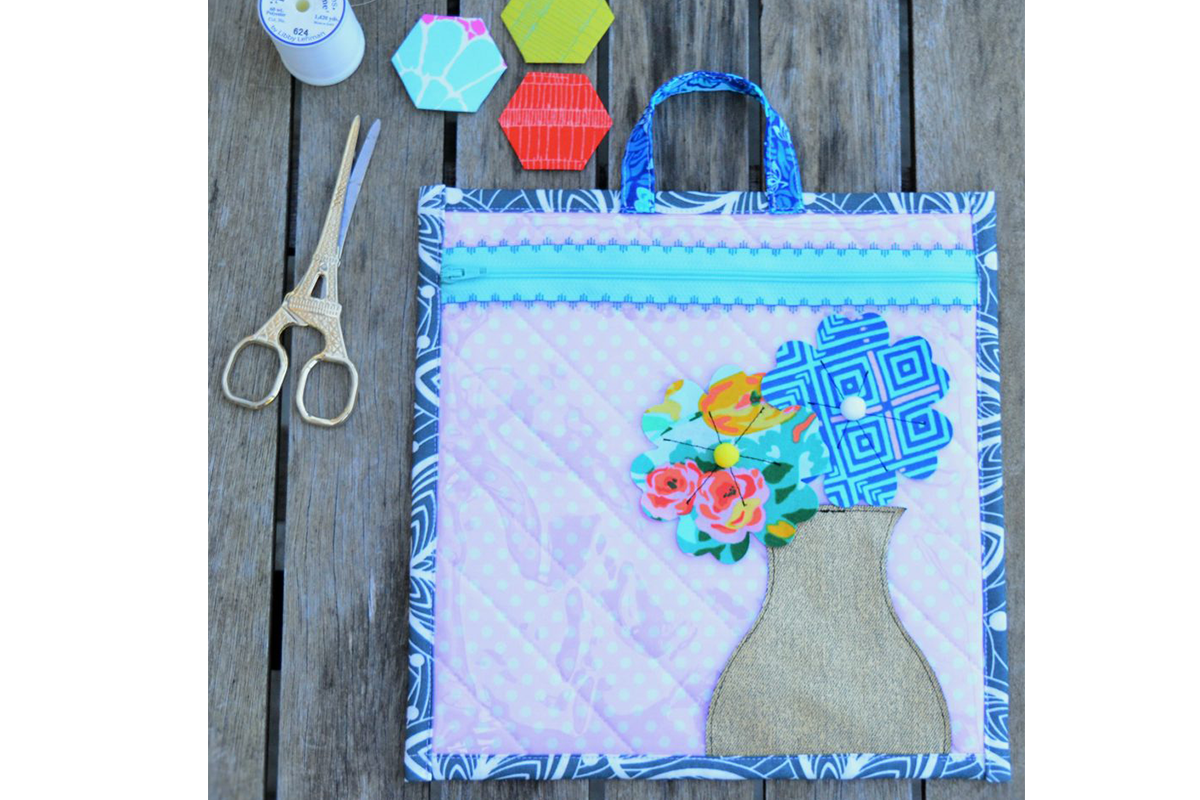
With Christmas well on the way, this cute and useful Maker’s Project Pouch will be the perfect gift for all your sewing friends!
Get creative and try out some of your GO! appliqué dies on this fun project. You’ll have a handmade gift made in no time!
Materials
- GO! Big Fabric Cutter
- AQ55007 GO! Round Flower
- AQ55451 GO! Big Square- 10” (9 ½” Finished)
- AQ55137 GO! Cutting Mat 6 in. x 6 in.
- AQ55146 GO! Big Cutting Mat 14 in. x 16 in.
- 30cm | 12” bag wadding
- 30cm |12” PVC plastic
- 30cm | 12” spot printed fabric
- 12” square of backing fabric (also creates the binding)
- 12” zipper
- 5” square metallic coloured denim or similar
- (4) 4” squares fabric scraps (flowers)
- (2) 4” squares fusible web
- (2) mini pom-poms
- Acid free glue stick
- Craft glue
- Quilting clips
- Contrasting thread for zipper
- Matching threads for quilting and construction
- Basting spray
- Narrow double sided tape
Cutting Instructions
- Using AQ55451 GO! Big Square – 10” cut:
- (1) bag wadding
- (1) spot fabric
- (1) PVC plastic
- Using AQ55007 GO! Round Flower cut:
- Prior to cutting, iron fusible web to the wrong side of (2) 4” fabric scraps. Remove the paper backing and place the remaining 4” fabrics scraps on top (wrong sides together) and fuse. This creates a double sided fabric. Cut out (2) of the large flower shapes.
- Fold the 5” square of metallic denim in half and position the folded edge so it overhangs the edge of the die (by approximately ½” – ¾”) and in the middle of the ‘stem’ shape (refer to diagram 1). This create a ‘vase’ shape.

Sewing Instructions
- Lay the 12” square of fabric (right side facing down), then spray baste the 10” square of bag wadding and position in the centre of the 12” square. Spray baste the 10” square of spot fabric and position on top of the bag wadding (right side facing up).

- Refer to Diagram 2: Quilt this piece using either straight, diagonal or cross-hatched lines. Note: ensure you match your bobbin thread with the fabric used for the 12” square.
- Using a quilting ruler, measure down 1 ¼” on the PVC plastic and draw a line with a pen, (refer to diagram 3).

- Attach double sided tape along the wrong side of the zipper teeth. Remove the paper backing from the tape and position the zipper onto the PVC plastic, lining up the edge of the zipper along the line you drew, (refer to diagram 4).

- During the next step it would be valuable to change your sewing machine foot to an open toe or narrow edge foot. Using a contrasting thread and a fun decorative stitch on your sewing machine, sew along the edge of the zipper tape. Ensure you keep the centre of the foot running along the edge of the zipper whilst you sew.
- Turn the PVC plastic over and trim away the plastic behind the zipper, between the decorative stitches. Remove this piece including the double sided tape as it is no longer required.
- Using a glue stick, attach the vase shape along the bottom, right edge of the plastic. Use a straight stitch to raw edge applique around this shape.
- Refer to diagram 5: Overlap flowers slightly and attach using a small amount of glue in the centre. Using a triple stitch, sew varying lengths crossing over each other to hold the flower in place. Note: these flowers are slightly 3D.

- Move the zipper pull inside the PVC plastic and trim off the excess zipper.
- Place your quilted fabric/bag wadding unit on an iron board and press the edges of the larger square inwards so that it meets up with the edges of the bag wadding, (refer to diagram 6). Repeat for all (4) sides.
- Place the PVC plastic piece in the centre of the quilted fabric/ bag wadding unit. Self-bind around the outer edge by folding the edges of the larger square in again (concealing the raw edges inside). Use quilting clips to secure the fabric over the PVC plastic. Keep the corners squared or mitered if desired. Use your sewing machine to stitch down the binding. Note: it can be helpful to use a Teflon or Roller foot on your sewing machine to prevent it from sticking to the PVC plastic.
- Using craft glue, attach the mini pom-poms to the centre of each flower. Alternatively, you could attach buttons.