
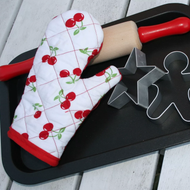
Once I saw this oven mitt pattern, I knew I had to replicate a mini version for my daughters! It is so adorable with the cherry fabric and quilting lines. I will admit there was a little frustration at turning a small version of this the right way in - especially the thumb! But with my trusty chopstick in hand (or Harry Potter wand as my daughter thinks it is) I got it done and was so pleased with how quick and easy this project was on my Singer 9100 Stylist. I was also able to find just about everything I needed in my scrap box.
Happy Sewing.
Jo, comfortable sewer and crafter and mum to two adorable girls.
Shopping List
-
9” (23cm) x 6” (15cm) batting x 2
-
9” (23cm) x 6” (15cm) insul-bright x 2 (not required if only for child's play mitt)
-
9” (23cm) x 6” (15cm) Main Fabric x 2 (outer pieces)
-
9” (23cm) x 6” (15cm) lining fabric x 2
-
46cm of 25mm bias binding
-
Co-ordinating threads
What to Cut
- Trace and cut the mitt pattern onto each wadding and fabric - folding right sides of the fabric together, ensuring you have a mirror image of each.
NOTE: if making a child’s mitt for play the insul-bright is not necessary. Never leave a child unsupervised near a real oven.
How to Assemble
TIP: if you want to applique or add decorative stitching to the main fabric do so now!
- Sandwich a lining fabric wrong side up, batting, Insul-Bright and the main fabric right side up.
- Repeat with the remainder fabric making sure it is a mirror image.
- Stitch each sandwich together using a straight stitch and a ¼ inch seam, ensuring you do not sew the wrist seams together! NOTE: In this version we chose to sew a straight stitch in a crosshatch pattern - if your machine has an Edge / Quilting Guide like the 9100 its easy!
- Place the two sandwiches together, right sides facing each other, and stitch the two together, finishing the raw edges with a zigzag or overlock stitch.
- Turn right side in. NOTE: if making the child’s glove keep your patience and a chopstick handy!
- Using the free arm on your machine, finish raw edge of the wrist by sewing bias binding around the edge. NOTE: the child’s mitt will most likely not fit your free arm, so turn the mitt upside down and sew the bias.
Remember, children should never be left unsupervised near a real oven!