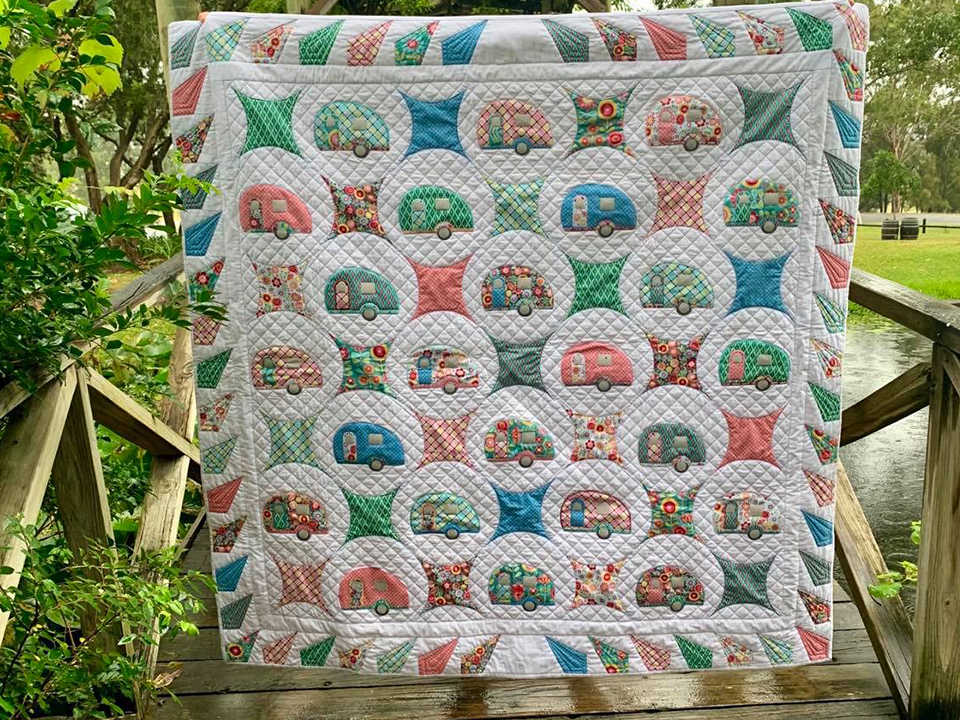
Do you love camping and exploring, or do you need a quilt for that certain someone that does? Then this is the quilt for you!
The retro camper is combined with traditional piecing and quilting to create this fun and funky quilt.
Materials:
Cutting instructions:
*All instructions will now be in Imperial measurements as per standard patchwork and quilting measurements.- From main fabric:
- Cut (5) 8” strips:
- Crosscut into (24) 8” x8” squares for appliques.
- Cut (7) 9” strips:
- Using AQ55068, cut (100) side Shape B.
- Cut (1) 17” strip:
- Using AQ55025, cut (8) 2” strips for border.
- Cut (6) 5” strips:
- Using shape 16, cut (108) Triangle in Square – sides
- From left over pieces:
- Using AQ55018 or AQ55060 cut (2) 4 ½” squares.
- Cut (5) 8” strips:
- From each print fabric:
- Cut (1) 8 ½” strip:
- Using AQ55068, cut (3) centre Shape A
- Cut (1) 6 ¾” strip. Iron fusible web to the back of fabric:
- Using AQ55228, cut (3) of each Camper, Door and Side Accent
- Cut (1) 5” strip:
- Using Shape 15, cut (6) kite shapes.
- Cut (1) 8 ½” strip:
- From light grey fabric:
- Cut (3) 1 ½” strips:
- Using AQ55228, cut (24) of each Door Window, Window 1 and Inner Wheel/Circle
- Cut (3) 1 ½” strips:
- From dark grey fabric:
- Cut (2) 2” strips:
- Using AQ55228, cut (24) Outer Wheel/Circle
- Cut (2) 2” strips:
- From binding fabric:
- Cut 16” strip:
- Using AQ55017, cut (6) strips.
- Cut 16” strip:
Sewing Instructions:
Camper Applique
Hint:Sort all you applique pieces into the desired combinations prior to starting to avoid ‘doubling up’ when appliqueing with the same fabric.
Applique:
- Find the centre of (1) 8” block by folding vertically and horizontally. Finger press fold lines.
- Using (1) of each: camper, door, side accent, door window, window 1, inner wheel/circle and outer wheel/circle, remove paper backing from shapes.
- Arrange the camper as per image on die cover, aligning centres with centres of block. Iron in place.
- Pin a square of tearaway to the wrong side of block.
- Using embroidery thread in top thread and bobbin fil in the bobbin, applique around each shape, changing colours as you go.
- Repeat for all 24 blocks.
- Trim all blocks to 7 ½” x 7 ½”.
Design feature: Use an assortment of satin, blanket, motif or decorative stitch for appliqueing on each Camper to add interest and texture. Contrasting and matching threads will also add variety.
Embroidery:
- Download the free GO! Camper Embroidery Designs here
- As per your machine instructions, use the embroidery designs to embroidery each Camper.
- Repeat for all 24 blocks.
- Set aside.
Rob Peter to Pay Paul Blocks:
All seams are ¼” unless otherwise stated.
- Using (1) print fabric piece A and 4 white piece B, lay out cut pieces as shown right.
- Pin (1) piece B to piece A, right sides together, matching centre notches. The point end of piece B will extend about ¼” beyond the squares off end of piece A. Stitch with ¼” seam allowance, with piece A on top, easing the two curved edges to match. Carefully iron seam allowance towards B piece being careful to not push fabric and create distortion. See image 1.
- Follow Step 12 instructions, pin and sew second piece B to centre piece A. See image 2.
- Continue to pin and sew third piece B to centre piece A. See image 3.
- Continue to pin and sew forth piece B to centre piece A. See image 4.

- Once block is complete, trim off dog ears from block corners. Block should measure 7 ½” x 7 ½”.
- Repeat instructions 11 to 16 for all 25 blocks. Set aside.
Kite Blocks:

Quilt Assembly:
- On a design board, or floor, layout your applique Camper Blocks and pieced Rob Peter to Pay Paul blocks alternatively on floor to make 7 blocks across and 7 blocks down.
- Sew blocks together in rows. Pressing seams in different directions for each row.
- Sew rows together, matching seams. With the seams pressed in different directions, the seams should nest. Press.
- Sew the short ends of (2) 2” strips together. Press seam open. Repeat to make 4 strips.
- Crosscut (2) strips at 49 ½” and (2) strips at 52 ½”.
Hint: When cutting sashes or borders, always cut so the centre seam is in the middle of the strip. This way you will have an ‘even’ looking quilt. - Match centres and pin the (2) short border to opposite sides of the quilt. Sew and press seam to outer edge of quilt.
- Match centres and pin the (2) longer border to the top and bottom of the quilt. Sew and press seam to outer edge of quilt.
- Select 13 Kites blocks. Following the orientation on the pattern, sew together to form one side border. Repeat with another 13 Kite blocks, orientating in opposite direction for other side border.
Hint: You may like to lay complete border out to space the colours evenly. - Match and pin centres of borders. Sew and press to outside of quilt.
- Select 12 Kite blocks and 1 plain square. Following the orientation of the quilt, sew 6 kite blocks on each side of the plain square. Repeat for last border in correct orientation.
- Match and pin centres, and seams of borders. Sew and press to outside of quilt.
Quilting and Finishing:
- Layer wadding between quilt top and backing.
- Pin or baste layers together.
- Machine quilt with an all-over design.
- Add binding, mitring corners.
It is lovely .thank-you for sharing