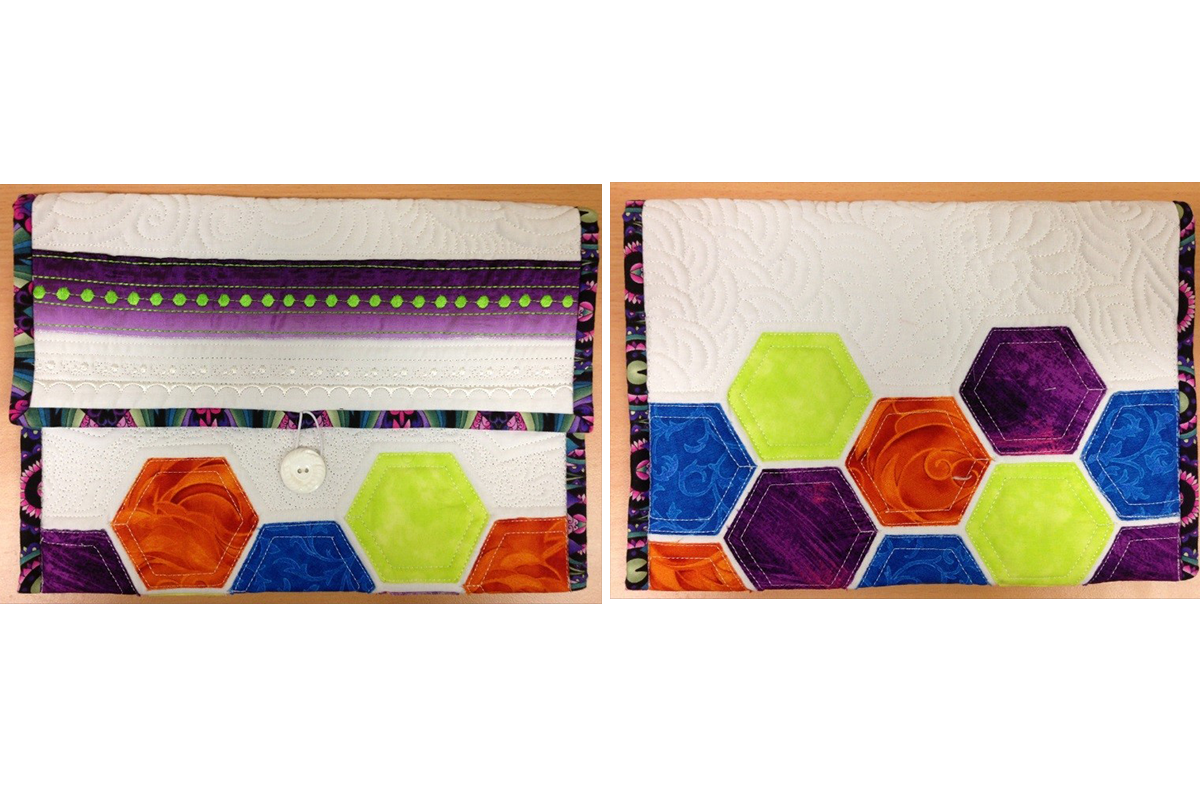
What better way to keep your iPad or tablet safe than in this fantastic Hexie iPad Cover. Created by Michelle Pearson from Handcrafters House, Midland WA, this is not only practical but also a perfect gift for that someone special or, even for yourself.
Materials
AccuQuilt GO! Baby, GO! Cutter or GO! Big
AQ55011 GO! Hexagon 2″, 3″ & 5″
AQ55017 (or AQ55014) GO! Strip -2½” cut.
AQ55112 GO! Cutting Mat 6″ x 12″.
AQ55113 (or AQ55138) GO! Cutting Mat 10″ x 24″ (or 6″ x 24″).
Fat ¼ White Homespun
Fat ¼ Lining Fabric (keep in mind you will quilt on this).
15cm of Binding Fabric (can be same as lining).
40cm x 50cm Wadding (100% low loft polyester is ideal)
20cm each of 4 Fabrics for Hexagons.
30cm x 5cm Wide Ribbon
Iron on Fusible Webbing.
1 x 25mm Button (of your choice)
10cm of Hat Elastic
10cm x 30cm Tearaway stabiliser
Threads for decorative stitching (contrasting) on Ribbon, Quilting & Bobbin.
General Quilting, Sewing Tools, Accessories & Patchwork Cutting Tools
Fabric Marking Tool – ensure it will not permanently mark the fabric (not a wash away one).
Spray Basting Glue or Basting Pins
Cutting & Sewing Instructions
Preparation:
Cut the white fabric into a 12½” x 19½” rectangle.
Measure 3½” in from one 12½” end of the white fabric and draw a line across the rectangle. This will be your alignment line from where you start placing your hexagons.
Cut the lining and the wadding each into approx. 14½” x 21½” rectangle
Press fusible webbing onto the back of the four 20cm squares of fabric for the hexagons.
Hexagons:
Fold each of the four 20cm fabric squares, with fusible web ironed on the back, into 4 sections. (I.e. Fold in half, and then in half again).
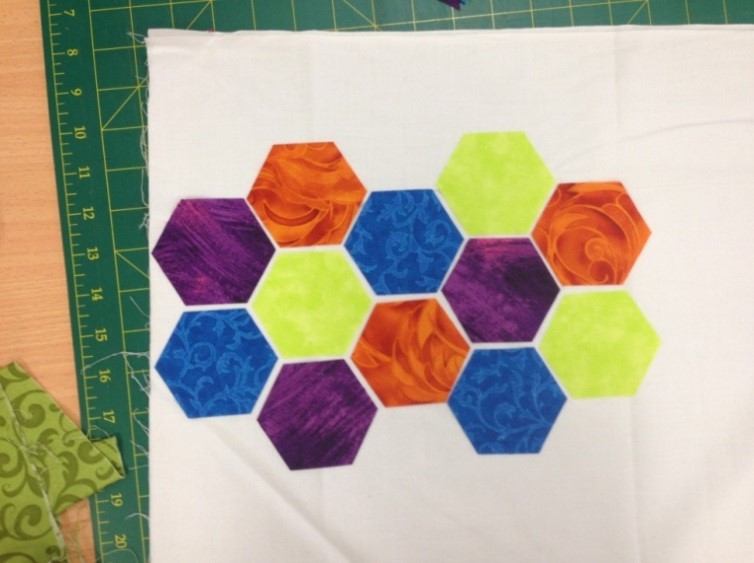
Working with one fabric at a time; layer each of the folded fabrics on top of the 3″ hexagon on die AQ55011, cover with the cutting mat and run through your AccuQuilt cutter to cut 4 hexagons. You will get a total of 16 hexagons.Photo 1: Arranging hexagons across fabric
Refer to photo 1: Arrange your hexagons as you see in the picture, placing the starting row along the drawn line (3½” in from the bottom edge). Leave about 1/8″ between each hexagon. Hexagons should almost completely extend across the fabric (12½”) from one side to another. When you have them in place, press well.
Decorative Stitching
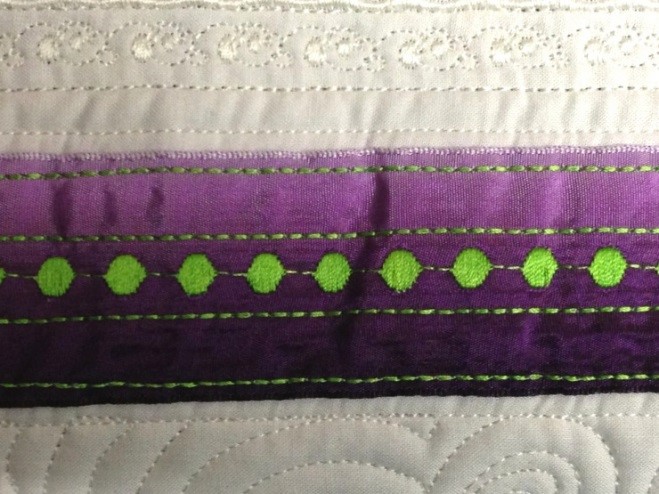
Measure 3½ from the opposite 12½ side of the hexagons and draw a line across the fabric. Align one edge of the ribbon to this line so that the ribbon is situated closer to the edge of the white fabric. (If it is aligned on the other side of the line – closer to the hexagons, the placement will be incorrect).
Pin the ribbon in place. Also pin the tearaway stabiliser to the wrong side of the white fabric, underneath the ribbon, ready for stitching.
Using contrasting thread in your machine, select different decorative stitches to fill stitchPhoto 2: Decorative stitching on Ribbonalong the ribbon – refer to photo 2. NOTE:Triple stitch is a great stitch for dividing lines with definition.
Once you have completed the stitching, tear away the stabiliser and press well. Remember to take care when pressing the ribbon – just in case it needs a delicate setting on your iron.
Quilting
Layer the prepared white fabric, wadding and backing. Baste the layers together using your preferred method (i.e. spray baste or pins).
Change to your chosen quilting thread and raw-edge applique (straight stitch just inside the raw edge) around each hexagon. Follow with an inside stitch approx ¼” in from the outside line. Refer to photo 3.Photo 3: Raw Edge Applique & Hexie Quilting
Once all the hexagons have been stitched down – quilt from one edge of the fabric to the other following ¼” from the outline of the grouped hexagons. Do this along the top and the bottom of the hexagons.
Change to a Free Motion Foot or the Echo Quilting Foot from Husqvarna Viking to quilt the rest of the project. Ideas – feathering, build-a-bridge, echo quilting, peacock feathers or teardrops, swirls/curls, stipple… whatever takes your fancy. NOTE: If you are not a confident free motion quilter, you can draw on cross hatch lines and follow those, or just continue to echo quilt the hexagons.
Binding:
Using the AccuQuilt die AQ55017 or AQ55014, cut TWO strips 2½” x width of fabric and join them, right sides together, end to end with a mitred seam. Press the complete strip in half lengthwise.
Find the centre of the project edge – the edge the ribbon is closest to and mark with a pin. Fold the hat elastic in half and make a loop that measures approx. 1¼”. Pin this loop securely at the half way point. Ensure that you pin the loop so that it is lying against the fabric. (facing inwards on the Project).
Pin binding to the right side of the project and sew around the edge, mitring the corners as you go. Join the ends together with a mitred seam. Take care that you secure the hat elastic loop very well – backstitching over it several times!
Hand stitch the binding to the lining side of the project. (You can machine sew if you prefer).
Finishing:
Measure up 3½” from the centre of the base edge (the hexagon end) and mark a small dot. Stitch the button securely at this point.
Fold up the base of the project approx. 6″, evenly matching binding edges together. Pin in place.
Stitch the two sides together – to make a pocket. Take care to be neat – try to stitch in the ditch of the binding edges.
Congratulations on finishing your Hexie iPad Cover!