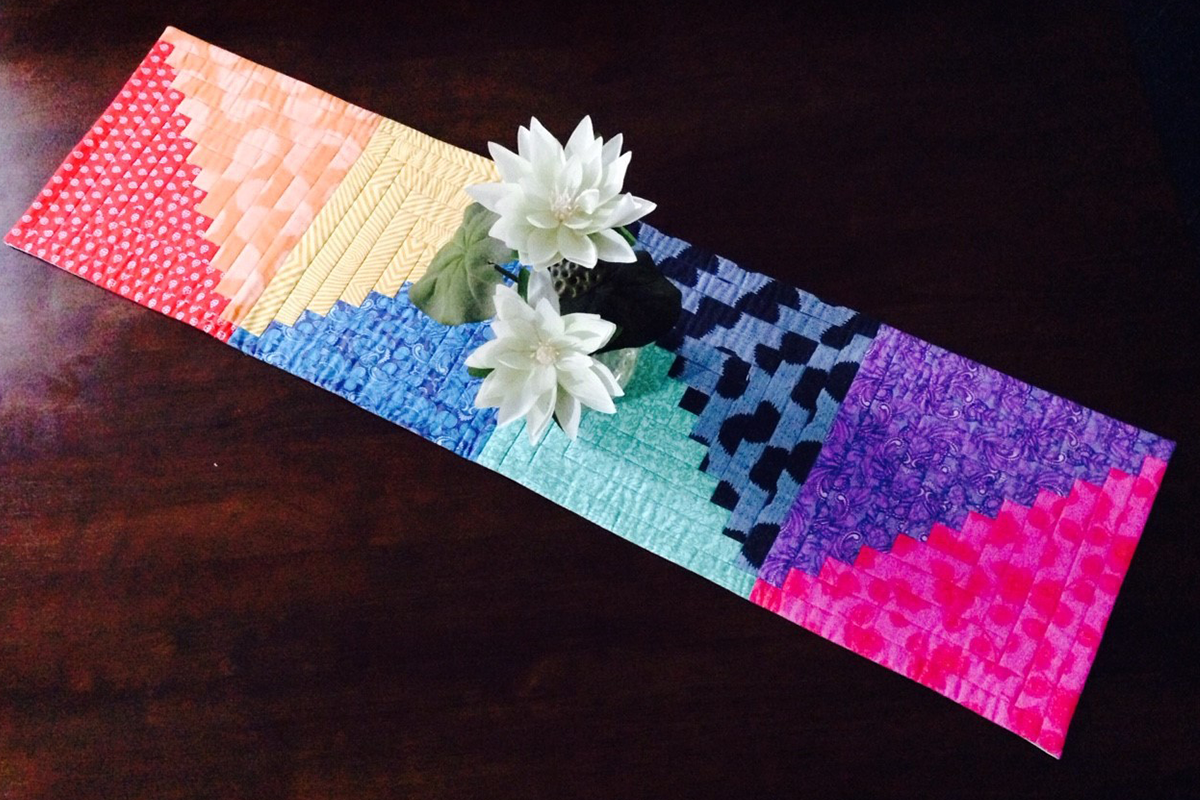
“What a lovely way to brighten up your table. This rainbow log cabin table runner is quick and easy to make and adds a little sunshine to your dining room.”
Materials:
- GO! Big or GO! Cutter
- AQ55349 GO! Log Cabin 12in Finished Square by Leslie Man
- AQ55017 GO! Strip Cutter – 2 ½in (or AQ55014)
- AQ55113 GO! Cutting Mat – 10in x 24in
- Eight x 65cm (25 ½in) strips of different rainbow prints
- 1m (1 ¼ yard) backing fabric
- 40cm (16in) 100% cotton wadding
Cutting Instructions:
- Using the eight rainbow prints:
- Cut 12 log cabin strips in each colour using AQ55349 GO! Log Cabin 12in Finished Square by Leslie Man.
- From backing fabric
- Cut two 40cm x 66cm (16 in x 26 in) rectangles for the back
- Using AQ55017 (or AQ55014) cut four 5cm (2 ½in) strips for binding.
- From the 100% cotton wadding
- Cut one 40cm x 1.3m (16in x 5in) rectangle.
Sewing Instructions
- Using the photograph of the table runner as a guide, layout the different print in stitching order, then group the colours in pairs.
- Beginning with the first log cabin block, take with the two 1 ½in squares, stitch together using a ¼in seam pressing the seam towards the darker colour. Stitch the 2 ½in strip of the top colour to the left-hand side of the two centre squares using a ¼in seam and press as before.
- Add the second 2 ½in strip to the bottom in the same way. Continue adding strips in an anti-clockwise direction changing colours as required until all the strips for both colours have been used. Press finished log cabin block.
- Complete four log cabin blocks in the same way. Layout the four blocks into the finished colour order, then stitch together into a row using a ¼in seams. Press the seams open.
- Stitch the two 16in x 26in backing fabric strips together using a ½in seam and press the seam open. On a flat surface lay the backing fabric with the wadding on top smoothing out any wrinkles. Layer the stitched log cabin row on top and smooth out in the same way. Baste the layers together with safety pins or your preferred method.
- Using a matching thread and a walking foot quilt in the ditch along all seams.
- Trim the excess backing and wadding from the outer edges.
- Join the four 2 ½in binding strips together using a diagonal seam then press the binding strip in half lengthways.
- Cut two binding strips ¾in shorter than the length of the table runner. Place one strip 3/8in from the top edge, then stitch using a ¼in seam. Press the seam open, then press the binding to the back of the table runner and slip stitch the binding in place with matching thread. The raw edges will be covered by the next step. Repeat for the second long side.
- Cut two further binding strips ¾in longer than the short side of the table runner. Place a binding strip 3/8in past the top edge, then stitch using a ¼in seam. Press the seam open, then press the binding to the back, Fold under the raw edges at each end then slip stitch the binding in place with matching thread. Repeat for the second short side.