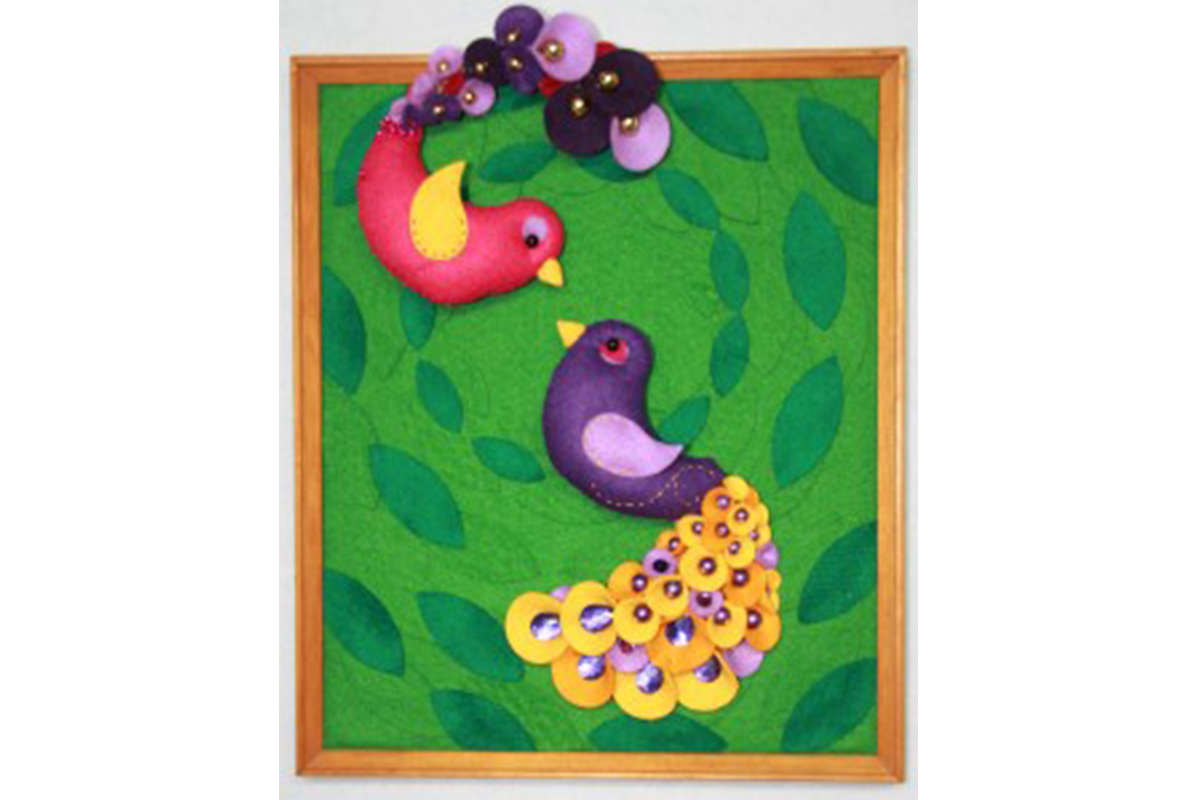

We are delighted to share the winning project from the Think Outside the Quilt Competition – Cadence by Lynda Nolan. We are sure you will agree that the use of felt to create an eye-catching piece of art truly shows the versatility of the dies. This project is a truly wonderful DIY home decor project that will look magnificent in any home.
Pink Peacock Construction
Materials
- AQ55324 GO! Birds
- AQ55333 GO! Owl
- AQ55045 GO! Rose of Sharon #1 by Sharon Pederson
- Felt; Pink (in two shades), Purple (in three shades) and Yellow
- Threads to match
- Assorted beads and sequins for decoration
- 2 black beads for eyes
Additional Requirements
- Hand sewing needles
- Fabric glue
- Beading wire
- Beading headpins
- Toy fill stuffing
Cutting Instructions
- Cut two birds out of the pink felt using AQ55324 GO! Birds die (I used the top bird on the die)
- Cut two beaks from AQ55333 GO! Owl die from yellow
- Using the purple and dark pink felt, cut approximately 20 circles using AQ55333 GO! Owl die (eye shape) and AQ55045 Rose of Sharon die (using all three circles)
- Cut one wing out of yellow felt from AQ55324 GO! Birds die
Assembly Instructions
Tail Construction
- Start with the tail feathers. Feed a bead onto a head pin. Take a circle and dotting one edge lightly with the fabric glue, wrap that edge gently around the base of the bead and hea
- Using the beading wire, create a 7-8 inch (17-20cm) curve that the felt feathers will be attached to. Give it a curve so that it will sit above the birds head when mounted.
- Starting with the largest feathers, group your purple feathers into sets of three. Wire these gently with the beading wire so that they all face the same way.
- Wrap the feather posies onto the curved framework, covering the framework but stopping 2 inches (5cm) before the end of the framework. Taking the small pink feathers, fill in any gaps between the purple feathers. You may want to lay the ‘tail’ on a flat surface with a bird shape to check that you are happy with your feather coverage. Too few feathers will give the appearance of a moulting peacock. Not attractive.

Body Construction
- Taking one very small pale purple circle, place it where you will want the eyeball to go and hand stitch in place with matching thread. This will make it easier to see the eye bead on the darker felts.
- Lay the pink body pieces together and trim the point off the tail. Trim only enough for the tail wires to fit in when the body has been sewn together. Hand sew the body pieces together, leaving the trimmed tail and 1-2 inches (4cm) at the belly open.
Assembly
- Insert the tail piece into the hole at the tail end of the bird. Glue or stitch the lower part of the tail framework into place against the back body piece (this is the side which will not be seen from the front when mounted). If glued, allow to dry before moving onto the next step. You’re doing really well, now might be a good time for a cup of tea.
- Stuff the little bird tightly and sew the belly opening closed.
- Sew the wing, eye and beak in place and add any decorative stitches.

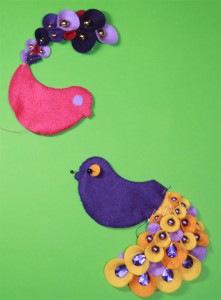
- Now is a good time to name your peacock. Mine is called Phoebe.
Purple Peacock Construction
Materials Used:
- Felt; Purple (in two shades), Pink and Yellow (in two shades)
- Threads to match
- Headpins
- Assorted beads and sequins for decoration
- Toy fill stuffing
- 2 black beads for eyes
Additional Requirements:
- Hand sewing needles
- Fabric glue
- Beading wire
- Beading headpins
- Toy fill stuffing
- Pins
Cutting Instructions:
- Cut two birds out of the dark purple felt using AQ55324 GO! Birds die (I used the top bird on the die)
- Cut two beaks from AQ55333 GO! Owl die from yellow
- Using both shades of yellow and the light purple felt, cut approximately 30 circles using AQ55333 GO! Owl die (eye shape) and AQ55045 GO! Rose of Sharon die (using all three circles)
- Cut one wing out of pale felt.
- Cut one bird shape (same shape) out of yellow felt
- Cut one small circle (AQ55045 GO! Rose of Sharon die) out of pale purple
- Cut one Owl beak (AQ55333 GO! Owl die) out of pink
Assembly Instructions:
Tail Construction
- Follow step one for the Pink Peacock.
- Arrange one of the purple shapes and the yellow bird shape on a flat surface overlapped with the head of the yellow bird situated behind the tail of the purple bird (the yellow bird will become the base for your tail feathers). Move them around until you have the shape right for the flowing tail. This will also show you how much you will need to trim off the purple pieces for the tail to flow properly. Mark on both pieces with pins where they will overlap. Do not cut off the head of the yellow bird; this will be how you attach the tail. Trim purple tail to suit flow of new tail. Trim second purple bird shape to match.
- Starting at the bottom tip of the tail and using the largest feathers first, start to build your feathers up. You may want to lay everything out first and then take a photo to help even placement and positioning before you glue. Stagger the yellow and purple feathers and use the wire of the head pins to help you gain height and dimension in your tail.
- Once you have the feathers positioned so that you are happy with how they lie, go back and glue the feathers down with fabric glue, using the yellow felt base for support. Lightly glue new feathers onto previously laid feathers for extra hold.
Body Construction
- Taking one very small pale purple circle, place it where you will want the eyeball to go and hand stitch in place with matching thread. This will make it easier to see the eye bead on darker felts. Lay the pink ‘owl beak’ over the top of the circle and stitch down in the same way.
- Place the purple body pieces together and, starting at the top back of the tail, stitch around toward the head and around the rest of the body, leaving a 1-2 inch (4cm) gap at the back where the tail will attach.
- Stuff the little bird tightly
Assembly
- Pinning the tail into place between the layers of purple, continue to sew and stuff, maintaining tension on the bird and closing the gap while also attaching the tail. (Despite how this may look, it is possible to achieve with only two hands… and possibly a set of teeth. Preferably your own)
- Sew the wing, eye and beak in place and add any decorative stitches.

- This little guy will also need a name. This one is called Gerald.
Leaves
Materials Used:
- Green felt in two shades for leaves
- Rectangle of green felt to cover backing of picture frame for mounting
Additional Requirements:
- Picture frame
Cutting Instructions:
- Cut green felt into leaf shapes (large and small) using AQ55045 GO! Rose of Sharon die
Finishing Instructions:
- Cover the backing on your frame with the lighter green felt, leaving the frame clear of felt. This will be your backdrop for your scene. Arrange and glue your leaves in desired pattern, starting with the lighter green to match the background and then adding the darker leaves.
- Arrange your peacocks so that they are gazing at each other.
- Once you are happy with your placement, glue your peacocks into place with the fabric glue, propping them in place until the glue dries.