So it recently came to my attention that many ladies struggle with ‘maths’ behind a block. They find a block or design they like, but find it extremely difficult to translate how to make it with the GO! Cutter and dies.
Well it might surprise you that I don’t worry about the maths. With the Qubes, the maths is done for me! Even if I don’t have a GO! QUBE, the corresponding numbers for the individual dies can be found on the 216 Quilt Block Pattern Booklet. I look at the shapes and how they fit together and the easiest (and quickest) way that I can sew them together.
Marie on our ‘AccuQuilt Addicts’ Facebook group asked if “Anyone had a tumbleweed pattern using the dies”. Well, a google search of Tumbleweed quilt brings up many, many, many options and of course they are all different! Lucky for us, Marie was able to supply some images of what she was trying to achieve!


This is easy- right? We can break this block down into its own shapes- squares, half square triangle’s (HST’s) , and / or chisels? Well, yes and no.
We can easily make this block with any GO! QUBE except for the 4 outside corners, circled right. There is no ‘easy’ way to do this exactly the same, although we can adapt, and of course our version is going to be so much better!

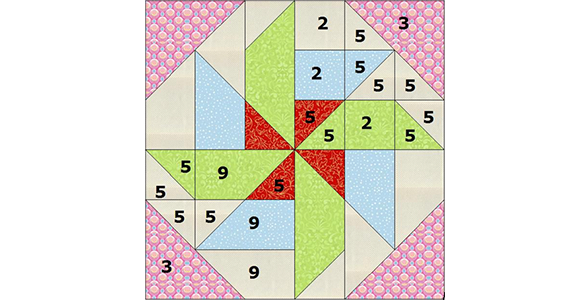
Looking at the block, you can see that it is essentially 4 repeats within the block, which all have been rotated 90° (don’t worry, I promise the pictures get better). So lets break this down further and we have two different sewing options.

Option One – with a GO! Qube Mix and Match Set

Taking the bottom left-hand corner we can see it in an easier assembly. It has now been broken down into a series of squares and half square triangle’s (HST’s). This is easy enough – right?
So we are going to step away from this block for a moment to take our attention to the third page of the 216 Mix and Match Block set and the GO! Qubes so we understand how this works. The GO! Qube consists of 8 dies, which all work in conjunction with each other to give a finished block size of 6”, 8”, 9” or 12”. This system works off a 4 patch system, (2 x wide and 2 x high) for the finished block.

Shape 1 is always a quarter of this size. i.e. In the 6” finished block, Shape 1 is 3” finished square and in the 9” finished block, Shape 1 is 4 ½” finished. So there is (4) Shape 1 in a finished block.
Shape 2 is a quarter of this size again, so there will be (16) Shape 2 in a finished block.
Shape 3 is a HST which coordinates in size with Shape 1, so there will be (8) Shape 3 in a finished block.
Shape 4 is a Quarter Square Triangle, (QST) which finished size coordinates with Shape 1, so there will be (16) Shape 4 in any finished block.
Shape 5 is a HST, although this time it coordinates with Shape 2, ie it is a smaller HST and you will need (32) Shape 5 to complete a finished block.
Shape 6 is a Square on Point. You cannot make a block alone with this shape as they need Shape 5 to complete one quarter of the block. Although it is square, it is a different size to Shape 1, and as the description implies, it is meant to be on point. Four of these are needed with (16) Shape 5 to make a finished block.
Shape 7 is a parallelogram, which is along the same line as Shape 6. It also needs Shape 5 to complete the square, so you will need (8) Shape 7 and (16) Shape 5 to complete the finished block.
Shape 8 is a rectangle of which you will need (8) to complete the finished block
Now, let’s take another look at Diagram 1, above. What do you notice? It is a 9 patch, not a four patch… but that’s ok.. we have this. Let’s look back at our shapes and let’s slot them in. We know (2) Shape 5 will give us a square, so top right, top left and centre square are sets of (2) Shape 5. We have three squares, Shape two, top centre, right centre and right bottom. We also need 2 extra shape 5 to go onto the middle and bottom row.
So you may ask now, how do you know you need Shape 5 and not shape 3? Well, you can see we have put Shape 3 in the bottom left corner, and that is the largest HST in the GO! QUBE. If we had used Shape 3, in place of Shape 5, then we do not have a HST larger than this one, so it would not work without hand cutting. and it would end up an extremely large block! (This is just a quarter remember!)

Now, remember our corner issue I spoke about earlier? In the original photo, there was more background fabric between the point of the blue fabric and the pink corner piece. Unfortunately, we are not able to create that with the system, but rather have the blue point marrying up to the pink HST… and it looks great.
Option Two – with a GO! Qube Mix and Match Set and a Companion Set- Classic or Corner
In the GO! Qube Companion Set – Corners or Classic, you have a Chisel, Shape 9. Shape 9 removes the need to sew (1) Shape 2 and (1) Shape 5 together, (and if you are anything like me, I like to have as few as seams as possible, particularly on a busy block like this!) Refer to picture below to see the difference.

What Size Qube do I use now???
Ok, we have the shapes we need, but what size Qube do I use to sew it??? Well, you can use any of the 4 GO! QUBES, as the number coordinate to ALL the GO! QUBES. Keep in mind what you want the overall pattern to look like, ie how many repeats, if you want to add connector blocks, sashings, etc

Using the GO! Qube Mix and Match Block – 6” Finished. Working on the overall block and remembering that Shape 3 is ¼ of the size of the 4 patch block is 6” finished, this finished Tumbleweed Block would be a 9 patch block, 3 across and 3 down. This size of this block would be 9” finished.
Using the GO! Qube Mix and Match Block – 8” Finished, the size of the block would be 12” finished.
Using the GO! Qube Mix and Match Block – 9” Finished, the size of the block would be 13 ½” finished.
Using the GO! Qube Mix and Match Block – 12” Finished, the size of the block would be 18” finished. This is quite large and for me, I would not use this for a repeated pattern, but more as a centre on a medallion quilt.
What if I don’t have the QUBE?
Like in every sewing, or quilting project, there is always more than one option on ‘how to’. The reference chart below shows you the corresponding individual die numbers to the Shape numbers in each size. It is easy to convert over.

But what if we wanted it smaller again? Well, we have to look and see of the shapes required are available in the product catalogue.
Half Square Triangle – 1” Finished Square. Referring to the chart above, the larger HST is twice the finished size of the smaller one, which means the larger HST would need to be 2” finished. There are two dies available, AQ55063 GO! Half Square Triangle 2” Finished Squares – Multiples or AQ55018, GO! Value die. Using these three dies would make the block 6” finished!
See – no maths! It was just a matter of breaking the block down into its smallest components and then coordinating the pieces together. This is why I love my QUBES! Below are some layouts I have prepared.

I hope you have found this informative!
Let me know if I can assist you with converting your blocks.
Thanks Debbie, appreciate you doing the maths for us
Thank you!!!!!! This helps so much!!!!
Margaret
I am looking forward to using my Accuquilt Go! I bought in 2012. Time to use it, don’t ya think? I recently bought a lot of dies. I like the way you numbered the pieces in the block. Thank you.
Thanks Deb, love learning about what the cube sets can do